FREE NZ SAMPLE SHIPPING OVER $18

FREE NZ SAMPLE SHIPPING OVER $18

Search

Edge Trims for Wall Tiles

Complete your self-adhesive wall tiling job with smart accessories.

Vinyl Home -Gift Card

Shopping for someone else? Treat them with a DIY gift card and let them select their favourite design.

Tool Bundle
Get all the tools you need for your project

Equip yourself with the right tools and take your DIY project to the next level!

DIY: Create new placemats in less than 10min

Are you sick of looking at your old dated placemats? Or maybe you're like me - had enough of constantly washing them and want something that doesn't look like a Disney movie?

For this project I bought a pack of six new placemats from the dollar store. This is what they looked like:

Kitchen breakfast bar with blue, green and red bar stools
oranges patterned placemats laid flat on bench


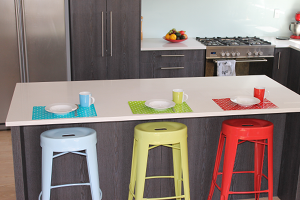
You might have guessed it: not my cup of tea! For the makeover I picked these colorful polkadots. Not only do they appeal to the kids, they also match with my bar stools and I like the look of them too!


green, blue and red polkadots vinyl rolls in white rustic tray outside

I started by measuring the placemats and then marked it on the backing paper of the sticky back plastic. For these placemats I allowed an overhang of 1-2 cm on each side and the reason for this I'll tell you soon.


right hand marking gridded vinyl backing paper with pen


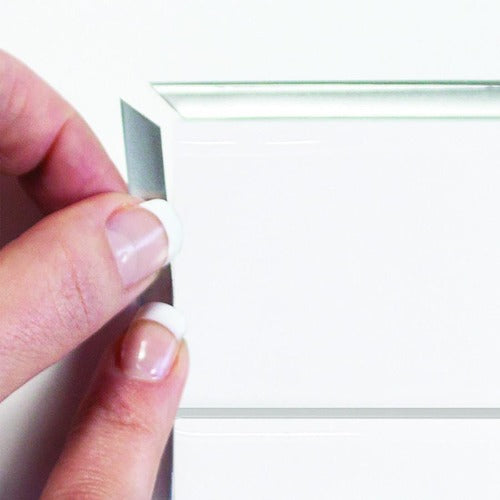
I peeled approximately 4 cm off from one of the short ends of the backing paper and positioned it on the placemat.


backing paper of vinyl partly folded down in one end


I gently applied 2 cm of the film to the placemat and the remaining overhang of 2 cm I attached to the working table. This made the thin placemat stay in place while I used my both hands for the next step.


polkadot blue vinyl partly being applied to oranges patterned placemat


From here I followed the normal guidelines and pulled the backing paper with one hand and smoothed the sticky back plastic to the placemat with a squeegee. At the end I cut the remaining overhang off with a sharp knife. Here's the end result:


breakfast bar set with blue, green and red bar stool and matching placemats
green, blue and red polkadots placemats

Lessons learned from this project

  • allow for an extra overhang if the placemat is thin and won't stay in place by itself
  • alternatively get a friend or family member to gently hold one hand on the placemat


Skill Level

 This is definitely an entry level. The number one challenge is to keep the placemat still while working on it. No pulling over edges required.

Search

SAMPLE SHIPPING FREE over $18 in NZ
PROUDLY NZ owned & operated
ORDERS SHIP in 1 business day
EASY RETURNS within 30 days*
EASY INSTALLATION FREE tutorials
PROUDLY NZ owned & operated
ORDERS SHIP in 1 business day
EASY RETURNS within 30 days
PREMIUM TILES
EASY INSTALLATION
NO GROUT NEEDED
EASY TO CLEAN
HEAT & HUMIDITY RESISTANT
APPLY OVER EXISTING TILES
GUARANTEED TO STICK
AFFORDABLE AND HASSLE-FREE
EASY INSTALLATION
REPOSITION-ABLE
EASY TO CLEAN
RESISTANT TO MOISTURE & HEAT
CUT WITH CRAFT KNIFE
Premium trusted brand
Easy installation
No grout needed
Easy to clean
Heat & humidity resistant
Apply over existing tiles
Cut with craft knife
Guaranteed to stick
Affordable & Hassle-free Solution
Easy installation
Top quality
Easy to clean
Resistant to moisture & heat
Cut with craft knife
Easy installation
95% UV protection
Privacy film
Remove & Reuse
Easy installation
99% UV protection
45% protection against direct heat radiation
Remove & Reuse
Easy installation
99% UV protection
60% protection against direct heat radiation
Privacy & Glare protection
Remove & Reuse
Easy installation
Apply over existing tiles
Easy to clean
3D design
Suitable for wet areas when sealed
Easy installation
Waterproof
Skidproof
Strong Viscosity
Easy installation
Waterproof
Skidproof
Food safe
Dishwasher safe
Easy installation
Waterproof
Skidproof
Laundry safe
Premium thickness
Easy installation
Cut with craft knife
No grout or mortar needed
Apply over existing tiles
Hides old grout lines
Heat & humidity resistant
Easy to clean
Extra strong glue
Removable & Repositionable No residue, no damage — perfect for temporary upgrades
Easy to clean Low-maintenance surfaces that wipe clean with ease
No Tools Required Peel-and-stick designs that anyone can install
Landlord-Friendly Options Protective install methods for peace of mind
Tested by Renters Across NZ & AU Real-life results from real rental homes
Budget friendly
Easy installation
Flexible & Lightweight
No grout needed
Heat & humidity resistant
Cut with craft knife
Budget friendly
Easy installation
Hides old grout lines
No grout needed
Heat & humidity resistant
Cut with craft knife
Premium thickness
Easy installation
Hides old grout lines
No grout needed
Heat & humidity resistant
Cut with craft knife
GUARANTEED TO STICK
PROUDLY NZ owned & operated
ORDERS SHIP in 1 business day
EASY RETURNS within 30 days*